Add Responsive & stylish contact us widgets for blogger | techno-ahmad
Now you will learn how to save the contact us widget on my blog . we are use contact us page for blogger or other plateform please html code or css script and past do you want.
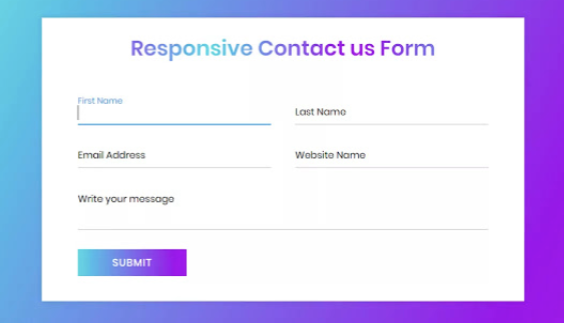
This html code lile shown that below which write Responsive contact us form
1: Checkout our product
Step 1:
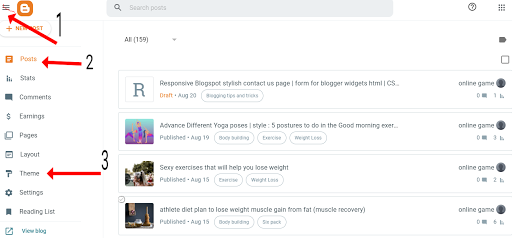
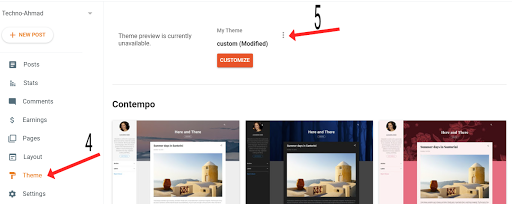
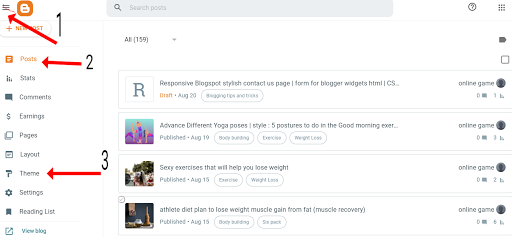
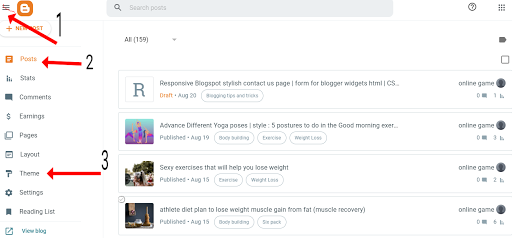
We have to play around/menu with the models section/function here. Click Templates in the left menu.
2nd step:
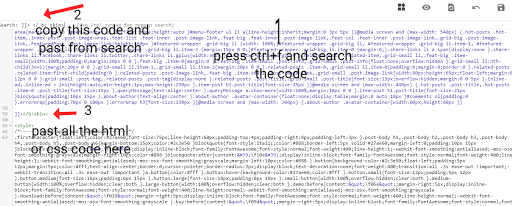
Then click on Edit HTML and you will receive your entire blog code in a large field.
Step 3:
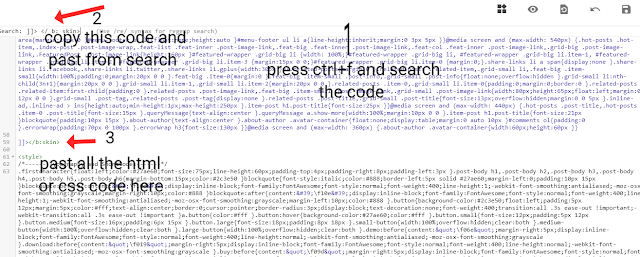
search for]]> </ b: skin> and place the following code just before it.
Step 4:. Past it below to press the enter and
Save this html code of contact us form.
<!DOCTYPE html>
<!-- Created By techno-ahmad -->
<html lang="en" dir="ltr">
<head>
<meta charset="utf-8">
<title>Responsive Contact us Form | techno-ahmad</title>
<link rel="stylesheet" href="style.css">
<meta name="viewport" content="width=device-width, initial-scale=1.0">
</head>
<body>
<div class="container">
<div class="text">
Responsive Contact us Form</div>
<form action="#">
<div class="form-row">
<div class="input-data">
<input type="text" required>
<div class="underline">
</div>
<label for="">First Name</label>
</div>
<div class="input-data">
<input type="text" required>
<div class="underline">
</div>
<label for="">Last Name</label>
</div>
</div>
<div class="form-row">
<div class="input-data">
<input type="text" required>
<div class="underline">
</div>
<label for="">Email Address</label>
</div>
<div class="input-data">
<input type="text" required>
<div class="underline">
</div>
<label for="">Website Name</label>
</div>
</div>
<div class="form-row">
<div class="input-data textarea">
<!-- Due to more textarea tag I got an error.. SO I changed the name of texarea tag into changeit. Replace the changeit text/tag to textarea-->
<changeit rows="8" cols="80" required></changeit>
<br />
<div class="underline">
</div>
<label for="">Write your message</label>
<br />
<div class="form-row submit-btn">
<div class="input-data">
<div class="inner"></div>
<input type="submit" value="submit">
</div>
</div>
</form>
</div>
</body>
</html>
CSS Contact us Form for blogger widgets
Now you will learn how to save the contact us widget on my blog .
Step 1:
We have to play around/menu with the models section/function here. Click pages in the left menu.
2nd step:
Then click on create a new page open it.
Step 3:
You can select the upper left side click here .
YOU CAN SEE two options <>HTML view and compose view. Select HTML VIEW
Step 4:. Past it below to press the enter and
Save this html code of contact us form.
@import url('https://fonts.googleapis.com/css?family=Poppins:400,500,600,700&display=swap');
*{
margin: 0;
padding: 0;
outline: none;
box-sizing: border-box;
font-family: 'Poppins', sans-serif;
}
body{
display: flex;
align-items: center;
justify-content: center;
min-height: 100vh;
padding: 40px;
background: linear-gradient(115deg, #56d8e4 10%, #9f01ea 90%);
}
.container{
max-width: 800px;
background: #fff;
width: 800px;
padding: 25px 40px 10px 40px;
box-shadow: 0px 0px 10px rgba(0,0,0,0.1);
}
.container .text{
text-align: center;
font-size: 35px;
font-weight: 600;
background: -webkit-linear-gradient(right, #56d8e4, #9f01ea, #56d8e4, #9f01ea);
-webkit-background-clip: text;
-webkit-text-fill-color: transparent;
}
.container form{
padding: 30px 0 0 0;
}
.container form .form-row{
display: flex;
margin: 32px 0;
}
form .form-row .input-data{
width: 100%;
height: 40px;
margin: 0 20px;
position: relative;
}
form .form-row .textarea{
height: 70px;
}
.input-data input,
.textarea textarea{
display: block;
width: 100%;
height: 100%;
border: none;
font-size: 17px;
border-bottom: 2px solid rgba(0,0,0, 0.12);
}
.input-data input:focus ~ label, .textarea textarea:focus ~ label,
.input-data input:valid ~ label, .textarea textarea:valid ~ label{
transform: translateY(-20px);
font-size: 14px;
color: #3498db;
}
.textarea textarea{
resize: none;
padding-top: 10px;
}
.input-data label{
position: absolute;
pointer-events: none;
bottom: 10px;
font-size: 16px;
transition: all 0.3s ease;
}
.textarea label{
width: 100%;
bottom: 40px;
background: #fff;
}
.input-data .underline{
position: absolute;
bottom: 0;
height: 2px;
width: 100%;
}
.input-data .underline:before{
position: absolute;
content: "";
height: 2px;
width: 100%;
background: #3498db;
transform: scaleX(0);
transform-origin: center;
transition: transform 0.3s ease;
}
.input-data input:focus ~ .underline:before,
.input-data input:valid ~ .underline:before,
.textarea textarea:focus ~ .underline:before,
.textarea textarea:valid ~ .underline:before{
transform: scale(1);
}
.submit-btn .input-data{
overflow: hidden;
height: 45px!important;
width: 25%!important;
}
.submit-btn .input-data .inner{
height: 100%;
width: 300%;
position: absolute;
left: -100%;
background: -webkit-linear-gradient(right, #56d8e4, #9f01ea, #56d8e4, #9f01ea);
transition: all 0.4s;
}
.submit-btn .input-data:hover .inner{
left: 0;
}
.submit-btn .input-data input{
background: none;
border: none;
color: #fff;
font-size: 17px;
font-weight: 500;
text-transform: uppercase;
letter-spacing: 1px;
cursor: pointer;
position: relative;
z-index: 2;
}
@media (max-width: 700px) {
.container .text{
font-size: 30px;
}
.container form{
padding: 10px 0 0 0;
}
.container form .form-row{
display: block;
}
form .form-row .input-data{
margin: 35px 0!important;
}
.submit-btn .input-data{
width: 40%!important;
}
}
How do I add a contact form (contact us) to Blogger?
Adding a contact form in Blogger is a tedious task as it does not support plugins like WordPress.
What most Blogspot bloggers do is seek help from third party sites (contacformgenerator, jotform, 123contactform, etc.).
But today you are going to learn how to add official contacts page in Blogger.
Part 1: Adding the Contact Gadget:
Follow the steps below to add a gadget to contact us on your blog.
Step 1:
Visit blogger.com and sign in to your account. If you are using multiple blogs, you must choose the desired blog from the list.
2nd step:
Click on Layout from the left sidebar to get an option to add gadgets.
Step 3:
You can see an Add a gadget link on the main panel on the right side. Clicking on it takes you to a list of gadgets.
Step 4:
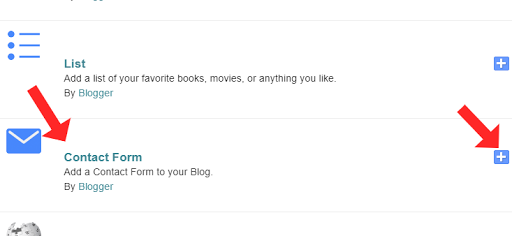
Then choose More Gadgets on the left side. Now you will see the contact form. Just add the same.
Part 2: Hide the gadget:
Now you will learn how to hide the contact gadget.
Step 1:
We have to play around with the models section here. Click Templates in the left menu.
2nd step:
Then click on Edit HTML and you will receive your entire blog code in a large field.
Step 3:
search for]]> </ b: skin> and place the following code just before it.
/ * CUSTOM CONTACT FORM BY
Name your Blogspot.com * /
.contact-form-widget {
margin-left: auto;
margin-right: auto;
width: 600px;
max-width: 100%;
padding: 0px;
color: # 000;
}
.fm_name, .fm_email {
float: left;
padding: 5px;
width: 48%
}
.fm_message {
padding: 5px;
}
.contact-form-name, .contact-form-email {
width: 100%;
max-width: 100%;
margin-bottom: 10px;
height: 40px;
padding: 10px;
font-size: 16px;
}
.contact-form-email-message {
width: 100%;
max-width: 100%;
height: 100px;
margin-bottom: 10px;
padding: 10px;
font-size: 16px;
}
.contact-form-button-submit {
border-color: # C1C1C1;
background: # E3E3E3;
color: # 585858;
width: 20%;
max-width: 20%;
margin-bottom: 10px;
height: 30px;
font-size: 16px;
}
.contact-form-button-submit: hover {
background: #ffffff;
color: # 000000;
border: 1px solid #FAFAFA;}
Then click Save to keep the changes.
After the third step, you won't see the Contact widget on your blog.
Part - 3: Adding a contact form to a page
You will get the personalized personalized blogger contact code here to be added to be displayed on a separate page.
Step 1:
Go to Pages and click on New Page.
2nd step:
Paste the following code into the HTML post editor after removing everything in it.
Save the template then go to Pages to create a new contact page if you don't have one yet. In the page editor, switch to HTML view and paste the following:
<div class = "ContactForm widget" id = "ContactForm1">
<div class = "contact-form-widget">
<div class = "form">
<form name = "contact-form">
<div class = "fm_name">
Your Name:
<input class = "contact-form-name" id = "ContactForm1_contact-form-name" name = "name" size = "30" type = "text" value = "" /> </div>
<div class = "fm_email">
E-mail Address *:
<input class = "contact-form-email" id = "ContactForm1_contact-form-email" name = "email" size = "30" type = "text" value = "" /> </div>
<div style = "clear: both">
</div>
<div class = "fm_message">
Message *:
<textarea class = "contact-form-email-message" cols = "25" id = "ContactForm1_contact-form-email-message" name = "email-message" rows = "5"> </textarea>
<input class = "contact-form-button contact-form-button-submit" id = "ContactForm1_contact-form-submit" type = "button" value = "Submit" />
<div class = "contact-form-error-message" id = "ContactForm1_contact-form-error-message">
</div>
<div class = "contact-form-success-message" id = "ContactForm1_contact-form-success-message">
</div>
</div>
</form>
</div>
</div>
</div>
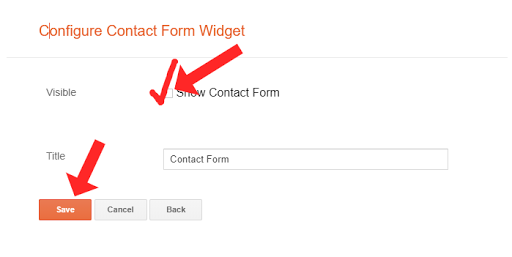
Step 3: Add a title (like Contact Us) and then change the settings given below.
Step 4:
Finally, click on the Publish button. That's all Messages sent from this contact form will be forwarded to the administrator email. If the blog has more than one admin, all will get them.
How to add a contact form on a subpage
We know the contact form very well. One of those gadgets that is very useful because you can write a message to the author without leaving the blog. Personally, I prefer to use the contact form than copy the e-mail address, open the e-mail and then write a message. In today's tutorial, I will show you how to put the contact form on the subpage, as it is in the contact tab , so that it does not get in the way on the sidebar and does not loom somewhere in the footer of the blog.
1. Enter the layout and select add gadget . When a new window opens, click "add more gadgets" and look for a contact form. When we find our form, click on the plus and then save .
Currently, our contact form is in the sidebar and let it stay there, or we can move it to the bottom of our column, in any case the form must be placed on the blog.
2. Go to the page where our contact form is to appear - in my case it is the test page, and then go to the HTML editor.
Paste the code:
<form name = 'contact-form'><div> Your name: </div>
<input class = 'contact-form-name' id = 'ContactForm1_contact-form-name' name = 'name' size = '30' type = 'text' value = '' />
<div> Your email address: <em>(required)</em> </div>
<input class = 'contact-form-email' id = 'ContactForm1_contact-form-email' name = 'email' size = '30 'type =' text 'value =' '/>
<div> Message: <em>(required)</em> </div>
<textarea class = 'contact-form-email-message' id = 'ContactForm1_contact-form-email-message' name = 'email-message' rows = '5'> </textarea>
<p> </ p>
<input class = 'contact-form-button contact-form-button-submit' id = 'ContactForm1_contact-form-submit' type = 'button' value = 'Send' />
<div style = 'text-align: center; max-width: 450px; width: 100% '>
<p class =' contact-form-error-message 'id =' ContactForm1_contact-form-error-message '> </p>
<p class =' contact-form-success-message 'id = 'ContactForm1_contact-form-success-message'> </p>
</div>
</form>C
1: publish or update, it depends on whether your page is just created or you are editing an existing page.
3 . Go to template - edit the HTML code, then expand the "Go to widget" list and select ContactForm1.
Once we are in the right place, expand our widget by clicking on the dots, which are marked in the frame below.
We repeat this action this time with <b: includable id = 'main'> ... </b: includable>
When everything develops, we remove the part of the code marked below . This will make the contact form disappear from the side column of the blog, but it will not disappear from our subpage to which we added it.
Warning! it is not possible to remove the contact form from the side column, this gadget must remain!






Comments
Post a Comment
Dont abuse .